Nifty Program: Input Director

July 4, 2010

I have had more than one computer for several years now, and between two and three monitors to share between them. However, I hate having two keyboards and two mice. Back when I was only using Windows XP, I used a free program popular in the tech community called Synergy. Not the easiest to set up, but it worked very well. Then Vista came out.

I went back to Windows XP for a year, but being a member of the tech community, I felt it was my responsibility to get to know Vista, despite it’s flaws. However, Synergy would not work.

I put up with two keyboards and two mice for about a year and a half before I stumbled upon a program called Input Director. By this point, I was using Windows 7 and Windows XP. It took a bit to figure out, but my computers are now living in harmony and using a single keyboard and mouse!

First, install Input Director on both computers.

SH_19

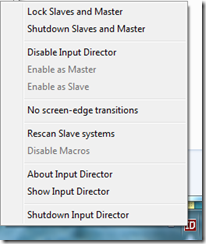
On the host computers (the computer the keyboard and mouse are attached to), once Input Director is installed, there will be a RED icon in the System Tray.

ID_systemtray

Right click the icon. The first time around, you will need to click ‘Show Input Director’ to set things up. After that, the moment the other computer is turned on, you may need to click ‘Rescan Slave Systems’.

SH_20

On the ‘Master Configuration’ tab, click ‘Add’, then type the name of the computer.


SH_05

You can find the name of the computer by right-clicking the ‘my computer’ icon on the desktop or Start Menu, then going to the ‘computer name’ tab.

ID (2)

Once that has been done, go over to the Slave computer, and right click on the Input Director icon. Click on ‘Show Input Director’, then on the ‘Slave Configuration’ tab.

ID (3)

Click on ‘Add’.

ID (4)

Enter the name of the host computer and click ‘Ok’.

In my experience, I didn’t have any firewall issues, but your security software might prevent Input Director from working properly.

You should now be able use a single keyboard and mouse with both computers.

Migrating Outlook Express To a New Computer

May 19, 2010

I was on-site yesterday visiting a client and discovered I needed to transfer their email and Address Book from their failing hard drive to the new hard drive I had setup for them. She uses Outlook Express, and it is not a simple process to migrate email data between hard drives or computers, especially when the data hasn’t been exported before the hard drive started to fail.

Once I had the new hard drive setup and working running Windows. I hooked up the old hard drive via an external hard drive USB enclosure to the new computer. I was thrilled that it was able to read it! I did some Google searches and found the exact locations of where Outlook Express stores its data, and the process in which to import it.

I opened up Outlook Express for the “first time”, and setup the client’s email account.

In my research, I found the the first thing to know in this process is that you can’t simply copy and paste the Outlook Express files from the old hard drive location to the new hard drive. The data must be imported through Outlook Express for it to be recognized.

Since these files are hidden, the first thing to do is unhide them. Go into the Control Panel -> Folder Options, and select the ‘see hidden files and folders’ option, and click ‘ok’.

In Outlook Express, Click on File -> Import -> Messages.

Navigate to the old hard drive and find the
C:\Documents and Settings\<User>\Local Settings\Application Data\Identities\ {GUID}\ Microsoft\ Outlook Express folder.

Cick ‘open’. Outlook Express should find the files it needs automatically and import them.

To import your Address Book (contacts), open the Address Book program on your computer. It can be found by going to Start Menu ->Programs -> Address Book.

Next, go to File -> Import -> Address Book, and navigate to C:\Documents and Settings\ {Username}\ Application Data\Microsoft\Address Book and click ‘open’. All of your contacts should be automatically imported, and show up in Outlook Express as well.

This process honestly wasn’t as painful as I thought it would be. I have honestly heard it can be a real nightmare. I suspect I got lucky when I found the right Google results. Most of the results pointed to articles describing the fairly simple process of exporting the correct way and then importing, not going to where the actual files are stored.

I can only hope this article helps many, and I strongly encourage you and potentially your clients to upgrade to Windows Live Mail after you finish setting up Outlook Express, and the latter is over a decade old.


DropBox – and why I love this service!

August 11, 2009

Due to the fact I have two computers, a laptop, and an iPhone, there are some documents, pictures, and other things that I want to be able to access at any time on any of them, and not have to worry about manually transferring the updated versions of each file.

About a year ago, I discovered a service called DropBox, which is completely free. You can upgrade to paid accounts starting at $10 for 50GB of space. If you’re happy with 2GB, it’s free.

All you have to do is save the documents to your DropBox folder that you want synchronized to your other computers, and the service does it automatically. It even saves a secure copy of the files on the DropBox servers for remote access if you’re not near your computers.

Even if the other computers aren’t turned on, they’ll download the latest versions of the files when they are turned on.

I am so impressed by this service! When I update a file on my main computer, and my laptop is on, it synchronizes with my laptop, and in seconds, the file is updated in my laptop’s DropBox folder, too! It’s such a fantastic way service in the time and headaches it avoids!

If you’re not using this wonderful service, download it free from www.getdropbox.com

SH_02

SH_03

SH_05


Cannot connect to Shaw FTP or E-Mail

May 23, 2009

As of a couple of years ago, Shaw Cable blocked FTP access to it’s webspace accounts from non-Shaw customers and IP Addresses.

Those who may have previously been Shaw Cable customers could no longer connect to Shaw’s webspace via FTP if they are trying to access those services from non-Shaw Cable internet connections, through programs such as Outlook or Thunderbird. Though, webmail can still be accessed by non-Shaw customers.

The solution? Hopefully a friend uses Shaw Cable, and you can download all of your content and upload it to a provider such as GoDaddy.com (their ftp instructions).

As for e-mail, if you still have mail coming to your previous Shaw e-mail accounts, log into the webmail service at http://webmail.shaw.ca, and forward all of your email to another account you can use for access through Outlook or Thunderbird. Another alternative is to use Yahoo Mail Canada, which still allows POP3 and SMTP access (go to your account settings, then ‘pop and mail forwarding’, as I recall). The USA version does not provide this service for free, it’s only available in the Plus version ($20 a year).

Learn how to setup your mail through Outlook 2007 (coming very soon)


Teamviewer Walkthrough

May 9, 2009

TeamViewer allows you to see another person’s desktop and control their computer through a secure, encrypted connection that is easy to setup and use. There is no risk associated with using it, as only those who you give the randomly generated user ID and password can connect. You must also “ok” the connection.

It’s very safe, and I have used it to connect to my parents’ computers back home and to a friend’s computer, who lives in Nova Scotia.

Important note: while it allows someone to see and control your computer, you see exactly what they are doing and can type and use the mouse the same as you’ve always done.

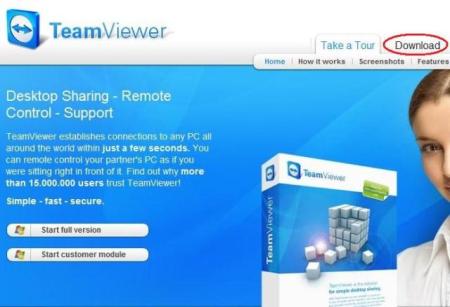
To install TeamViewer, go to www.teamviewer.com, click on the ‘download’

TV1 (2)

TV1 (3)

under ‘full version’, click the button next to the Windows icon.

TV1 (4)

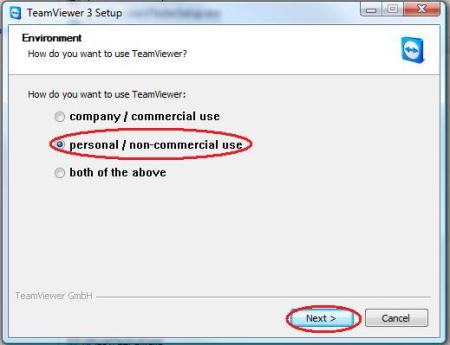
Double click the file you downloaded, and this screen will show up. Click ‘personal/non-commercial use’, and click ‘next.’

TV1 (5)

Be sure to click box checkboxes to accept the license agreement and to confirm the fact you’ll Only use the program for personal use.

TV1 (6)

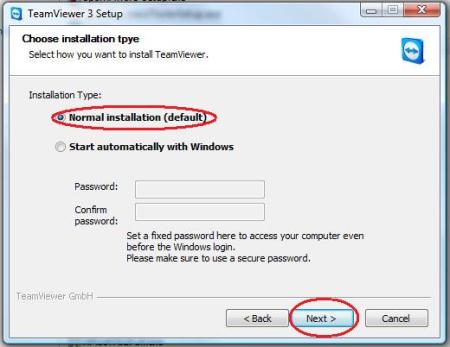
Click “normal installation”. There’s no need for TeamViewer to start when you log into Windows, so don’t Select that.

TV1 (7)
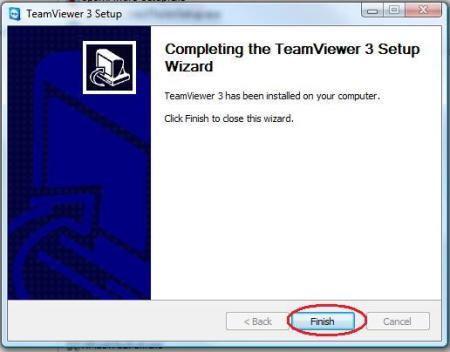
The program will quickly install, then click “finish” to complete the installation.

TV1 (8)

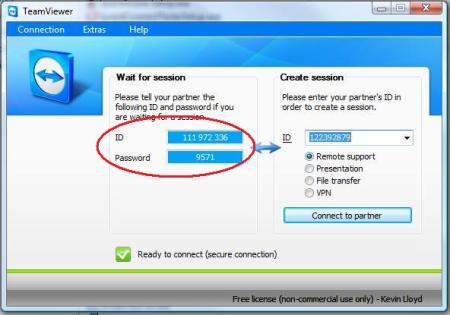
You will then see this screen every time the program starts. When someone (me) attempts to connect to your computer, simply provide the ID and Password under “Wait for session”. You should then be asked to confirm the connection. If not, that’s fine, it’s secure either way.

The ID and password and automatically generated each time the program starts, so noone can access your computer without that information or approval.


Change the size of desktop icons in Windows Vista

May 9, 2009

I’ve been asked a few times now by friends how to change the size of desktop icons in Windows Vista. There are two ways. These methods work in Windows 7 (RC1) as well.

1. left-click an empty area of the desktop once, and while pressing down the left CTRL key on your keyboard, use the wheel on your mouse to change the size of the icons.

2. right-click an empty area of the desktop, and choose ‘view’, and choose from ‘classic’, ‘medium’, or ‘large’.

desktopiconssize


Send large files over the internet

April 12, 2009

I’ve encountered a few situations in which I’ve needed to send someone a large file. E-Mail is great for small files, but is too unreliable for larger files. I started using Box.net, which works well enough, but it wasn’t quite what I was looking for, not to mention the effort and numerous clicks it takes to set up a “shared” file.

Since then, I’ve been using YouSendIt.com and Drop.io, which are much quicker alternatives and the recipient can download the file seconds later. Very convenient. Both have a 100MB limit, though they do have subscription services.

042

Drop.io’s plans start at $10 a month for 1GB of space, all the way up to$99.99 a month for 250GB of space each month.

052

YouSendIt.com’s plans start at $10 a month, too, and goes up to as much as $2999.99 a year for 60GB of storage.  Also,YouSendIt limit the amount of times a single can be downloaded to 100 times for it’s free service, unlimited for its other plans.

For more options, see Mashable.com’s list.


Use a song as a ringtone for the iPhone

April 6, 2009

NOTE: This is the my more detailed explanation of the process. If you’re looking for the quicker tutorial, from which this post was inspired. go here: http://www.pcworld.com/article/156234/turn_any_mp3_into_an_iphone_ringtone.html.

I wanted a way to use a song as a ringtone on my iPhone, and I didn’t want to pay for the priviledge. There is the option to download, for a fee, a song from the iTunes store, and pay another small fee to use it as a ringtone.

I don’t like spending money if I don’t have to, especially when it’s so easy to use one of your existing songs as a ringtone in about 30 seconds, once you get the hang of it and do it enough times. Here’s how.

1. First, find the song you want to set as a ringtone, and watching the playback timer, find the 30 seconds of the song you wish to use for the ringtone. i.e.: If a song is 3:38 in duration, maybe you only want from 0:23 – 0:53.

04

2. Left-click the song you want as a ringtone to select it. Right-click it, and choose ‘Get Info’.

05

3. On the ‘Options’ tab, put a checkmark in each box beside ‘start time’ and ‘stop time’, and enter those 30 seconds mentioned earlier, and click ‘ok’.

06

4. Right click the song again, and choose ‘create AAC version’. The new AAC version of the song will appear directly below the original song, and will be 0:30 long.

07

5. Right click the AAC version of the song, and left click ‘copy’. Right click and choose ‘paste’ in whichever folder on your computer you want to keep a copy of your ringtones.

08

6. Right click on the AAC song you just pasted into your ringtones folder, and left click ‘rename’. Change the extension to “.m4r”, and press enter to make the changes.

09

7. You will get a prompt confirming you want to change the file, click ‘yes.

10

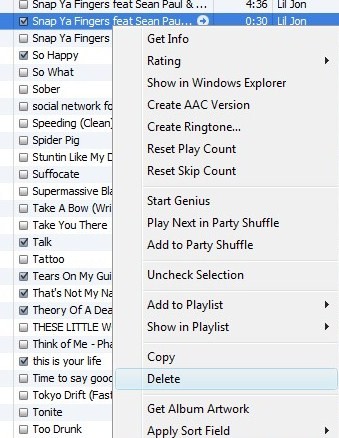
8. Back in iTunes, Right click the original AAC version of the song you copy&pasted, and choose ‘delete’.

13

11

041

9. Right click the original song, and choose ‘Get Info’.

051

10. Go to the ‘options’ tab, and uncheck those two boxes beside ‘start time’ and ‘stop time’, or every time you play that song from now on, it’ll only play those 30 seconds. Obviously, you don’t want that. Then click ‘ok’.

11. Go back to your ringtones folder outside of iTunes, and double left-click that “.m4r” file. It will automatically open in iTunes and be shown as a new ringtone.

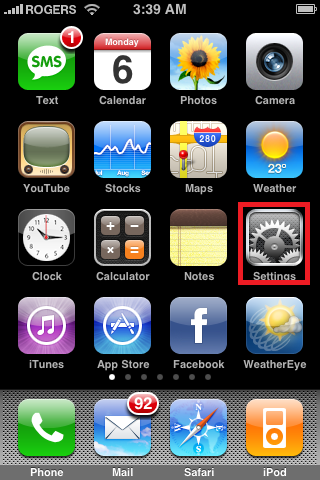
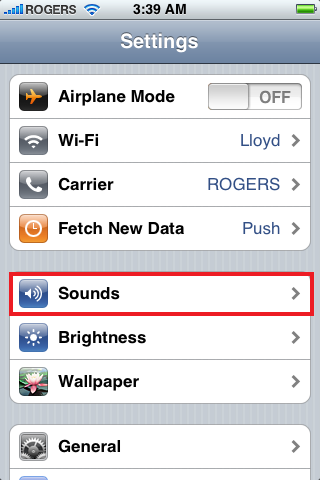
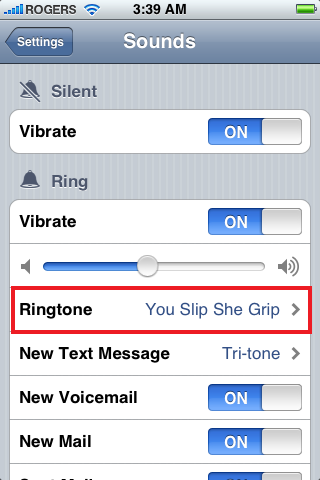
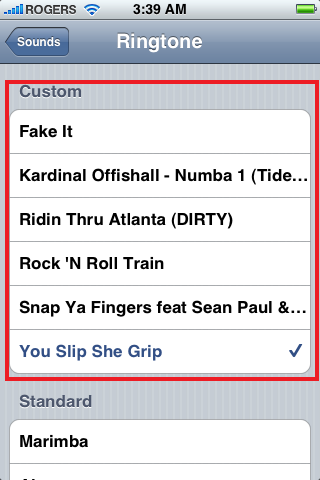
12. Now, all you have to do in sync your iPhone with your computer. To use the new song as a ringtone on your iPhone, under ‘settings’, and ‘sounds’, and ‘ringtone’, choose your new ringtone, so your iPhone will begin using it. (as shown below)

img_00091 img_00101

img_00111 img_00121


Monitor Your Monthly Bandwidth

April 1, 2009

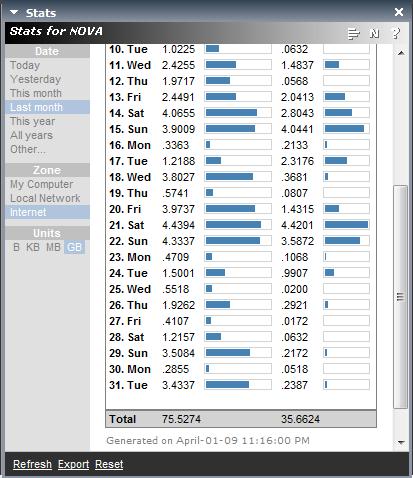
A few months ago, it occured to me that I had been downloading quite a bit. Since I don’t watch cable TV very much, I get most of my entertainment content online, which means I’m using up more bandwidth. I live in Canada and my ISP is Shaw Cable, and with their Xtreme-I package, only offer 100GB a month. That’s tough for me to hit on my own, but with three other housemates, it’s easy, so having a tool to monitor my own usage gives me peace of mind.

I found a free tool called NetLimiter. It has everything I could possibly need and more. You can monitor your daily, monthly, and even yearly usage, in KB, MB, and GB units. and even monitors the real-time bandwidth of every application running.

There are paid verions of the program available, but the NetLimiter 2 Monitor, which is the full name, is completely free.

netlimiter1

netlimiter2


Configuration Mania replaces about:config

January 27, 2009

props again to Tekzilla

For those who frequently access about:config via the Address Bar, there is now an add-on, Configuration Mania, that makes it even easier to manipulate those settings, especially for those who are uncomfortable with the geeky feel.

To get Configuration Mania, go to https://addons.mozilla.org/en-US/firefox/search?q=configuration+mania&cat=all

02

Now, click on ‘Add to Firefox’

03

Click ‘install now’ to install the Configuration Mania Firefox plug-in (add-on)

04

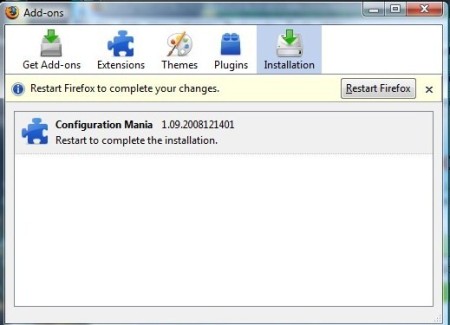
After Configuration Mania installs, it will ask you to restart Firefox for the new settings and change to take effect.

05

Firefo will inform you that it will try and restore your open tabs when it restarts. This has always worked for me, so I wouldn’t worry about it.

When Firefox restarts, you can access Configuration Mania via ‘Tools’ and ‘Configuration Mania’.

01

Configuration Mania will look like this:

06